Beginning of school year door decoration

boydoordecor

So the theme for our classroom this year is Reach for the stars. I wanted to make something cute for the kindergarteners to see when they arrived. I cut 4 inch stars using my Cricut machine. I wrote each students’ name on each star. My co-teacher and I brainstormed sayings for the door and we came up with Blasting Off to a Great Year in Room 208. Since I created a rocket ship/out of this world theme behavior clip chart I decided to create a similar rocket for the door. Time ran short so instead of using scrapbook for the flames on the rocket I used some streamers my co-teacher had in her desk. I actually like the look of the streamers better! We had many comments on how creative our classroom door was.

Kidney table set up

kidneytable

Once again while browsing Pinterest I came across a couple cute ideas that I wanted to incorporate into my room. I had some money left in my Amazon account from some gift cards so I bought these turquoise Wall Pops dry erase circles. I dislike always having to hand out white boards when I want students to practice/write something. This way everything is all right there. It also works as a work mat so everyone has their own outlined space to work in.

For the fabric I bought this cute turquoise chevron pattern fabric at Hobby Lobby. At Walmart I picked up some Stitch Witchery to hem it together. I can’t sew for the life of me (I want to learn how to though). I cut the length of the fabric after I got home to the measurements that I needed (4 yards for my particular kidney table). Make sure to cut it a little longer than you think since you will be folding the ends over.

After you have your fabric cut to the length you desire fold over about a half of an inch of the edges so that it is a clean mend. Follow the directions on the Stitch Witchery ( Place tape side up on flat non-folded edge of the fabric. Heat up iron and run over paper side for about 2 seconds, enough to warm up the adhesive). Next fold over the fabric so that the Stitch Witchery is covered. Run the iron over the fabric for about 5-6 seconds or long enough to get the adhesive hot enough for the fabric to stick together.

Grouping Cards

groupingcards


Two years ago I was trained in Moving Through Math by Marcia Daft. During one of the classes it was mentioned to make grouping cards to use in order to group students by 2’s, 3’s and 4’s. Above is what I came up with. I used 24 index cards as the plain white background and regular construction paper for the solid color background. Then I went to Hobby Lobby and bought scrapbook paper. I just needed one sheet of each design I wanted to use.

In order to group students by 4 you use the number on the card, i.e. there are 4 number 1’s, 4-2’s, etc… If you want to group students by 3’s you use the colored background color. There are 3 green, 3 black, 3 pink, etc… If you want to group your students by 2’s it is based on the scrapbook paper. There are only 2 school buses, 2 apple numbers, 2 music note numbers, etc…

I created 24 of these not only because we had 24 students but also because 24 is divisible by 3 and 4 so that way we could have multiple number groupings.

First Day of School Picture Frame

firstdayschoolframe

While looking through Pinterest to get ideas for back to school I saw many versions of a 1st day of school picture frame where your child holds a picture frame up with their face in the middle. It usually has the year and grade they will be going into.

Well, my daughter is starting 3 year old pre-school this year so I wanted to create something for her. I figured since I was already making it for her I might as well make another grade marker for my students at work.
Here is how I created mine:

I took an old cardboard box that I had laying around (it was a Fisher Price box that had a toy that my son got for his birthday). I used a box cutter to cut out one side so that way it was somewhat straight. Don’t worry about it if it’s not all the way straight, it gets covered up. Next, I found some light blue cardstock and used my Cricut to create a border to use around the edge of the cardboard. You could also use bulletin border edging but I didn’t have any at my house. After I glued down the border for my frame I cut out a star with the Cricut using 12×12 cardstock. I cut the star at 10″. Then I cut out the 1 and DAY at 4″ and the st at 3″ and the squiggly mark underneath at 1/2″. I also cut out a red apple at 4″.

*If you want to make it easier I have seen countless examples of doing this just by using an old picture frame                     without the glass. But when I saw one that was all crafted up I had to make my own!

I then created a crayon box that I added the school year to and a pencil that has the grade level here.  I have included crayon boxes from 2013-2018 and grade level pencils from 3 year old pre-school to 5th grade.

Then I happened to go to Michael’s and I found this cute purple paper so I had to make another frame. I figure the students can just choose which frame they want their picture taken with.

firstdayschoolframe1

The thought crossed my mind: What am I going to do with these pictures after I take them? Well, I have a few things that I am going to do with them. The first thing I will be doing is printing out each picture and making each parent a card during Parent-Led conferences, which is a week after we start school. On the outside of the card I will have the picture and then on the inside of the card I found this cute poem that I will include.

Another thing I am planning on doing with this picture is to include it in a kindergarten timeline for each parent. How I am doing this is I started our own classroom blog last school year to try and keep parents informed about what their child is doing in school. Throughout the year I will be good about taking pictures of the kids, especially since we have a class blog it makes it easier. At the end of the year I am planning on making a DVD slideshow for each family when their child graduates kindergarten!

Very Hungry Caterpillar 1st Birthday Party Overview

connerbdaybanner For my son’s 1st birthday I wanted a fun theme and something that would be memorable for years to come. Plus there will only be a limited number of years that I get to choose what his “theme” for his birthday will be. If my husband had any say it would be Denver Broncos every year. My favorite childhood book is by far The Very Hungry Caterpillar by Eric Carle. Since I am on summer break I had a little “extra” time, between 2 kids the extra time is nap/rest time and after they go to bed at night, to make something crafty for his party.

We debated where to have his party and ultimately decided that since we were getting a cabin at a local campground for Father’s Day anyways we would just have it there so we didn’t have to splurge and have it somewhere else (our house is just too small for a lot of people).

I will go over a quick overview in this post and then post more details about everything in their own posts. For the banner I used my Cricut and the Plantin SchoolBook cartridge for the circles, letters, apple, everything! I then used colored brads to link each body section to each other and that way I could manipulate it how I wanted. Then I used a thin red ribbon to connect the top to the bottom and extra off the ends to hang it up. When I made it we still didn’t have a definite location for the party and in reality there was nowhere to tie it down to so I ended up just using tape to keep it all up.

connerbdaymonthbanner

Each month for the first year I took monthly pictures of my son with stickers that I bought through Pickysticky.  I then used the same method with my Cricut to make a monthly picture caterpillar. Yes, I realize I forgot the antennae but by the time I realized that it was too late.

connerbdayinvite

In keeping with the theme the first thing I made were his invitations of course! The recipients of these invitations LOVED them. Read more about how I made these here.

connerbdayguestbook

Guestbook- I decided on making a fingerprint guestbook that I put in a document frame and hung in his bedroom. Check out the details here!

connerbdaytreatfavor1

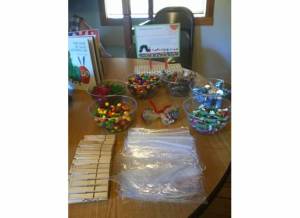
For party favors guests made butterfly treat bags. I kind of felt like it was Christmas in June because the majority of the candy I got was red/green to go with the color scheme. Check out the favor bags here!

connerbdayfoodtable

For the party food we used the foods that the caterpillar ate through in the story. I found the cutest labels online and made stands for them. Check out more details here!

connerbdayeggcarton2

connerbdaycoffeefilter1

We had two children activities for our younger guests to do while at the party. One activity was Egg Carton Caterpillars and the second activity was Coffee Filter Butterflies. Read about them here!

connerbdaycake

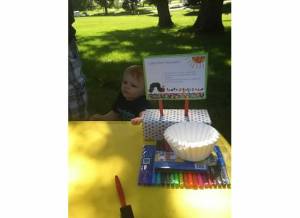
I searched all over for the perfect cake to fit my theme. NOWHERE has The Very Hungry Caterpillar. So I had to resort to DIY on the cake, which I was kind of afraid to attempt. But I think it turned out pretty darn cute! Check out the details here!

I had a BLAST putting this party together and the guests definitely noticed all my details. I think the majority of people said I know you’re a teacher because….

Very Hungry Caterpillar 1st Birthday Invites

connerbdayinvite

After deciding on the Very Hungry Caterpillar them for my son’s 1st birthday party the first thing on my to-do list was to create invitations. So naturally I turn to Pinterest to get my creative juices going! There I found my outline and invitation that I just HAD to have, so cute!  I found this idea on Catch My Party. I used most of the same wording but also added some of my own. Cardstock from Hobby Lobby, created circles with Cricut and the wording in a word document. I connected the segments of the caterpillar with green brads that I also found at Hobby Lobby. I was unable to find just green ones so I had to use my 40% coupon of a collection of 6 colors. Yeah I chose an off week that didn’t have the Spare Parts collection on sale for 50% off but I had to make them ASAP. I think I made 22 invitations, a Happy Birthday Banner and his 12 month timeline caterpillars using these green brads and I still have extras left over so there is definitely a lot in that little container.

connerbdayinvite1

Inside the cover of the invitation says: We can hardly believe a year has past. Our little caterpillar has grown up so fast! Come join us for some food and fun, Conner is turning ONE!!!!

connerbdayinvite2

Second body part says: Day of week, date, time Inch on over to place. I put in parenthesis specific location information since we were having it at a cabin we were renting for the weekend.

connerbdayinvite3


The third segment says: A table of eatable caterpillar goodies will be on display. Water and Juice will be provided. (feel free to bring any other beverage of choice and a lawn chair!)

On the fourth circle, which I didn’t include in the pictures it says: RSVP to Mommy and Daddy by date and phone number. We can’t wait to play!

Very Hungry Caterpillar butterfly treat favors

connerbdaytreatfavor1

Instead of making favor bags for my son’s 1st birthday with a bunch of cheap plastic toys for the kids I decided to let our guests create their own favor bags. I got this idea this past school year from one of my young students. We completed a butterfly unit in kindergarten and his birthday so happened to fall during this unit. For birthday treats he brought “butterfly treat bags.” He had plastic baggies, clothespins, pipe cleaners and candy. When planning Conner’s 1st birthday I remembered this and thought it would be a good idea to do that way anyone could have a favor bag and put things that they would actually eat inside them. Candy I included were green and red Frootis, M&M’s, skittles, green and red gummy worms, Hugs/Kisses/Cookies and Cream candies and green and red Sixlets.


Guests chose various candies to add to their bag and then divided the bag down the middle and clipped it with the clothespin. They could then use a marker to draw eyes and a mouth on the clothespin if they wanted. There were also pipe cleaners that they could wrap around the top of the clothespin as an antennae.


connerbdaytreatfavor

Very Hungry Caterpillar Birthday Guestbook

connerbdayguestbook

When looking through Pinterest to see about different guestbook options the one I kept coming across was writing a message to the birthday boy/girl in the actual The Very Hungry Caterpillar book for them to have as a keepsake.  While I do like this idea I wanted something different. I don’t know how I thought of this but I came up with a fingerprint caterpillar guestbook. I had Conner put his fingerprint in red as the caterpillars head and then each guest used one of the two shades of green stamp pads to stamp their fingerprint and use a fine tip sharpie marker to write their name. I had the guests write their names first and then do their fingerprint. After it was completed I bought a document frame and framed it to hang in Conner’s bedroom.

connerbdayguestbook2

Above is the caterpillar I created in Word to use for this.

connerbdayguestbook1

This was the sign I posted for the guestbook so that guests would know what to do. It says the following:

Please sign Conner’s Caterpillar Guestbook!

1. Please write your name inside a circle with the marker. 2. Add your “print” by using the green stamp pad and placing your fingerprint over your name (wipes are provided for your fingers)

Conner will be able to see everyone who helped him celebrate his 1st birthday!

UPDATED: Here is the editable document Conner guestbook caterpillar sign

Here is the finished guestbook (besides one space where my grandpa forgot to stamp his finger and another that is a baby):

connerfinishedguestbook

Very Hungry Caterpillar Birthday Party Food Display

connerbdayfoodtable

Sorry that the picture isn’t the best but the sun was shining right down on it and I wanted to get a picture before everyone started digging in. We went through The Very Hungry Caterpillar book and bought the things the caterpillar ate throughout the week for our party food. Instead of sausage we used hot dogs and hamburgers, but no one cared (except me probably). I found the silverware container (The Very Hungry Caterpillar container) in the dollar spot at Target a couple years ago. Since I’m a teacher and I love Eric Carle I had no clue that I would be using it for my son’s first birthday party in a few years.

 connerbdayfoodlabels

I found these cute food labels from Polkadots and Puppies for free and I believe there is a blank one as well to write your own. That is how I created the labels for the activities and guest book. After I printed the labels I mounted them to green cardstock and used a glue dot to attach them to a popsicle stick. I then went to Dollar Tree and picked up some floral craft foam and Hobby Lobby for some polka dotted scrapbook paper. I covered the floral foam with the scrapbook paper and then just stuck the popsicle stick down into the foam.